Introduction
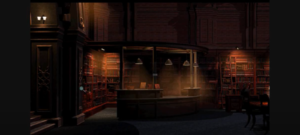
The Workshop in Rooms & Exits Chapter 2 Level 5 throws you into a craftsman’s domain brimming with tools, gadgets, and cleverly concealed clues. Unlike prior levels that spanned multiple rooms, here all puzzles unfold within a single, compact workspace. Success demands not only sharp observation spotting hidden items behind paintings or inside cabinets but also adept item management: combining components, interpreting symbolic codes, and revisiting objects once new information emerges. In this guide, we break down every challenge into clear, detailed rooms and exits walkthrough, enriched with expert insights, tables of item locations, and strategic tips to help you escape swiftly and confidently.
1. Explore the Tool Board
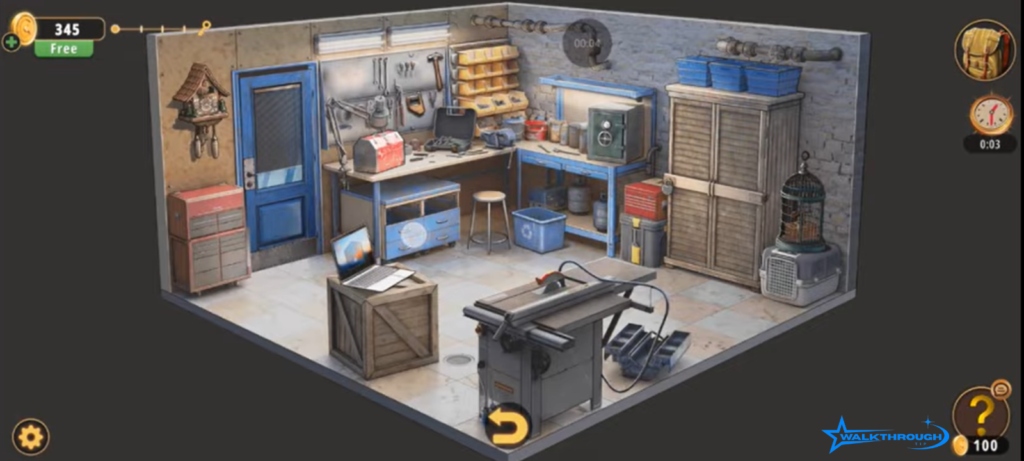
Before diving into complex puzzles, begin by familiarizing yourself with the workshop’s primary resource: the tool board mounted beside the exit door. A quick scan reveals two essential implements:
- Hammer
- Saw Handle
Adding these items to your bag sets the stage for early progression. The hammer will later help you extract a USB drive, while the saw handle, when combined with its blade, transforms into a cutting tool necessary to breach the locked cupboard .
Insight: In escape‑room design, tool boards serve as intuitive hubs for collecting basic implements. Always inspect such boards immediately upon entering a new area to avoid missing critical items.
2. Unlock the Red Toolbox
Adjacent to the workbench sits a vibrant red toolbox that conceals two more components you’ll need:
- Observe Wrench Sizes
- The three wrenches hanging on the board are labeled 4, 10, and 19.
- The three wrenches hanging on the board are labeled 4, 10, and 19.
- Enter the Code
- Input 41019 into the toolbox’s central lock.
- Input 41019 into the toolbox’s central lock.
- Retrieve Components
- Inside, you’ll find the saw blade and a metal rod .
Combining observational skills with basic code entry, this step exemplifies the game’s reliance on environmental clues. Noting the wrench sizes and concatenating them into a single code is a straightforward yet satisfying puzzle mechanic.
3. Assemble and Use the Saw
With the saw handle and blade in your inventory, it’s time to forge your cutting tool:
- Combine Components
- Open your bag, select the saw handle, then tap the saw blade and hit Combine.
- Open your bag, select the saw handle, then tap the saw blade and hit Combine.
- Cut the Wooden Plank
- Approach the right‑side cupboard secured by a thick wooden plank. Equip the newly assembled saw and tap the plank to slice it away.
This action exposes the hidden cupboard interior. The game’s Combine feature allowing you to merge two separate items into a new tool is a recurring theme in Rooms & Exits, rewarding experimentation and logical item pairing .
4. Investigate the Cupboard
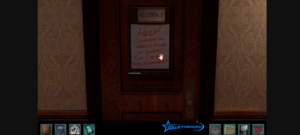
Upon breaching the cupboard, you’ll uncover a crumpled paper bearing a classic escape‑room puzzle:
- Read the Morse Code
- The paper reads …—…, which translates to SOS.
- The paper reads …—…, which translates to SOS.
- Flip for Additional Clues
- On the reverse side, you’ll find:
- On the reverse side, you’ll find:
XC = 3
4 = XL – 10
These cryptic notes foreshadow later Roman numeral puzzles. Recognizing Morse code and Roman numeral relationships is crucial, as they reappear throughout the workshop sequence .
Fact: The SOS Morse code pattern (…—…) is internationally recognized as a distress signal, making it a fitting puzzle element in an escape scenario.
You can also learn all about Rooms & Exits Chapter 2 Level 4 Walkthrough
5. Access the Laptop
Return to the workbench’s laptop to leverage your newfound clue:
- Enter Password
- Tap the laptop and input SOS.
- Tap the laptop and input SOS.
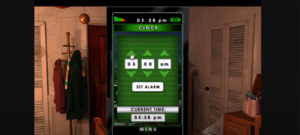
- Observe the Display
- The screen reveals a digital clock set to 14:00 (2:00 PM).
- The screen reveals a digital clock set to 14:00 (2:00 PM).
This step bridges the physical and digital realms, using a real‑world signal (SOS) to unlock virtual information that you’ll apply to a mechanical puzzle .
6. Set the Cuckoo Clock
Next, direct your attention to the cuckoo clock mounted on the workshop wall:
- Adjust the Time
- Pull the clock’s minute and hour hands to 2:00 (matching 14:00 in 24‑hour format).
- Pull the clock’s minute and hour hands to 2:00 (matching 14:00 in 24‑hour format).
- Collect the Key
- Upon setting the correct time, a hidden compartment opens, dispensing a small key.
- Upon setting the correct time, a hidden compartment opens, dispensing a small key.
Time‑based puzzles like this one test both your attention to digital clues and your dexterity in manipulating in‑game objects. Always cross‑reference digital displays with analog devices in escape‑room settings .
7. Unlock the Birdcage
With the key in hand, return to the birdcage positioned near the cupboard:
- Open the Cage
- Use the key to unlock the latch.
- Use the key to unlock the latch.
- Retrieve the Music Box
- Inside the cage lies a small music box.
- Inside the cage lies a small music box.
- Insert the Rod
- Combine the metal rod (from the red toolbox) with the music box.
- Combine the metal rod (from the red toolbox) with the music box.
- Read the Note
- Operating the box reveals a note stating 1 = L.
- Operating the box reveals a note stating 1 = L.
This multi‑step interaction key usage followed by item combination exemplifies the layered complexity of workshop puzzles .
8. Decode Roman Numerals
Now, compile all your Roman numeral clues:
| Clue | Interpretation | Numeric Value |
| 1 = L | L = 50 | 50 |
| 2 = X | X = 10 | 10 |
| 3 = XC | XC = 90 | 90 |
| 4 = XL – 10 | XL = 40 → 40 – 10 = 30 | 30 |
By transforming letter‑based clues into numeric values, you prepare to tackle the next combination lock. Mastery of Roman numerals commonly used in escape‑room design can significantly speed up your progress.
9. Open the Safe
Approach the safebox on the workshop table, which requires an eight‑digit code:
- Enter Sequence
Input 50109030, concatenating your Roman numeral values in order:
CopyEdit
50 | 10 | 90 | 30
- Retrieve the Bottle
- Upon unlocking, you’ll find a glass bottle containing a USB drive.
- Upon unlocking, you’ll find a glass bottle containing a USB drive.
- Smash the Bottle
- Equip the hammer and tap the bottle to break it open and extract the USB drive.
- Equip the hammer and tap the bottle to break it open and extract the USB drive.
- Note the Time
- The USB drive’s label reads 15:45.
- The USB drive’s label reads 15:45.
This multi‑layered puzzle blends numeral conversion with physical manipulation, reinforcing the importance of item reusability in the workshop environment .
10. Adjust the Cuckoo Clock Again
Armed with your new time clue:
- Set the Clock to 3:45
- Revisit the cuckoo clock and adjust its hands to 3:45.
- Revisit the cuckoo clock and adjust its hands to 3:45.
- Collect the Screwdriver
- The clock dispenses a screwdriver and reveals a scrap of paper marked with red paint.
- The clock dispenses a screwdriver and reveals a scrap of paper marked with red paint.
This revisitation underscores a key escape‑room principle: objects often serve multiple puzzle functions. Don’t overlook previously used items they may unlock fresh interactions .
11. Access the Red Paint Bucket
Finally, head back to the workbench area:
- Open the Paint Bucket
- Use the screwdriver on the lid of the red paint bucket tucked beneath the bench.
- Use the screwdriver on the lid of the red paint bucket tucked beneath the bench.
- Retrieve the Final Key
- Inside lies the exit key, the last item you need to complete your escape.
- Inside lies the exit key, the last item you need to complete your escape.
Combining tools and environmental elements one last time, this step caps off the workshop’s layered puzzle design .
12. Exit the Workshop
With the exit key in hand, walk to the main door:
- Unlock and Open
- Apply the key to the door’s lock.
- Apply the key to the door’s lock.
- Proceed to Level 6
- Congratulations you’ve conquered Chapter 2 Level 5 and are ready for the next challenge.
- Congratulations you’ve conquered Chapter 2 Level 5 and are ready for the next challenge.
This final act of unlocking brings closure to a level defined by iterative puzzle loops and strategic item management.
Items & Locations Table
| Item | Location | Purpose |
| Hammer | Tool board | Smash bottle for USB drive |
| Saw Handle | Tool board | Combine with blade to cut plank |
| Saw Blade | Red toolbox (code 41019) | Combine with handle to cut plank |
| Metal Rod | Red toolbox (code 41019) | Insert into music box in birdcage |
| Crumpled Paper | Inside right‑side cupboard | Contains Morse code (SOS) & Roman numeral clues |
| Small Key (1) | Cuckoo clock (set to 2:00) | Unlock birdcage |
| Music Box | Inside birdcage | Yields “1 = L” note |
| USB Drive | Inside smashed bottle from safe | Indicates time for clock puzzle |
| Screwdriver | Cuckoo clock (set to 3:45) | Open red paint bucket |
| Exit Key | Inside red paint bucket | Unlock main door |
Expert Tips & Tricks
- Maintain a Clue Log
- Jot down codes and conversions immediately upon discovery to avoid forgetting crucial details.
- Jot down codes and conversions immediately upon discovery to avoid forgetting crucial details.
- Revisit Objects
- Many puzzles require returning to earlier props (e.g., the cuckoo clock) once new clues emerge.
- Many puzzles require returning to earlier props (e.g., the cuckoo clock) once new clues emerge.
- Combine Strategically
- Experiment with merging items in your bag often the solution lies in inventive combinations.
- Experiment with merging items in your bag often the solution lies in inventive combinations.
- Leverage Environmental Storytelling
- Decorative details (like wrench sizes or Morse code patterns) are deliberate puzzle hints.
- Decorative details (like wrench sizes or Morse code patterns) are deliberate puzzle hints.
- Balance Observation with Action
- While thorough scanning is vital, avoid over‑analysis; when stuck, try interacting with different objects to trigger new clues.
Completion Rewards
- In‑Game Coins: Earned for level completion; can be used to purchase hints in future stages.
- Achievement Badge: Unlock the “Workshop Whiz” accolade in your profile.
- Experience Points: Accrue XP toward your overall escape‑artist ranking.