Introduction
Stepping into Rooms & Exits Level 7: Fashion Store transports you from the sweet aromas of a bakery into the sleek world of haute couture. Here, you’ll face puzzles woven into the very fabric of the shop: from styling mannequins with accessories to cracking locker codes hidden in mannequin displays. Success demands a blend of keen observation, creative item use, and pattern recognition skills that will serve you well as you navigate each rack, shelf, and dressing room. In this comprehensive walkthrough, we’ll guide you through every step, unpack the logic behind each puzzle, and reveal expert strategies for escaping the fashion store in record time.
1. Dressing the Mannequins
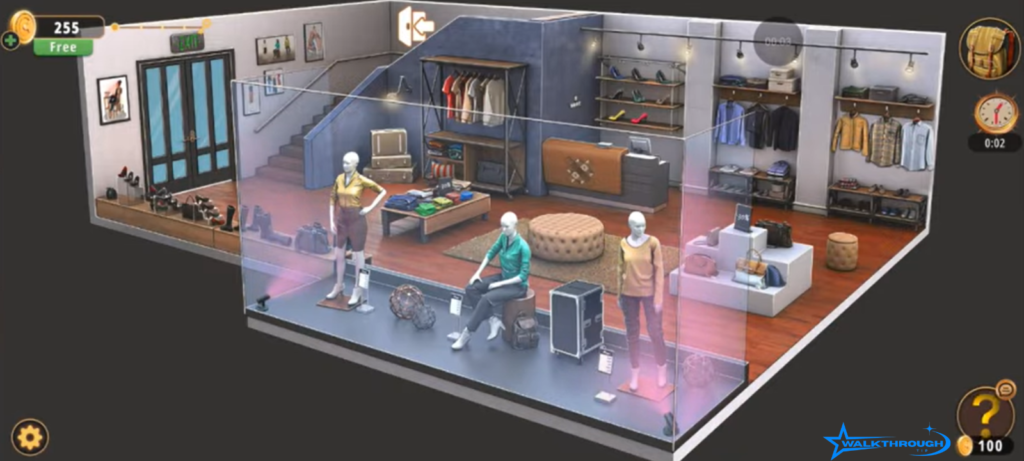
The fashion store’s centerpiece is a trio of mannequins awaiting your styling touch. This initial puzzle tests your ability to combine and use inventory items in a logical sequence.
First, collect the handbag:
- Location: On the plush sofa near the entrance.
- Action: Tap the sofa to retrieve a lady’s handbag.
- Inventory Tip: Select the handbag, then tap Dismantle to extract a scarf an elegant accessory needed for the first mannequin.
Next, dress the mannequins:
- Right‑Side Mannequin:
- Use the handbag on this mannequin. The purse snaps into its hand, triggering a soft click.
- Use the handbag on this mannequin. The purse snaps into its hand, triggering a soft click.
- Left‑Side Mannequin:
- Use the scarf on the first mannequin’s neck, completing its ensemble.
- Use the scarf on the first mannequin’s neck, completing its ensemble.
Each correct placement yields a visual cue a subtle light glow confirming you’ve styled that mannequin correctly. This puzzle reinforces the core Rooms & Exits mechanic of Use: selecting an item from your bag and applying it to the environment to unlock further interactions.
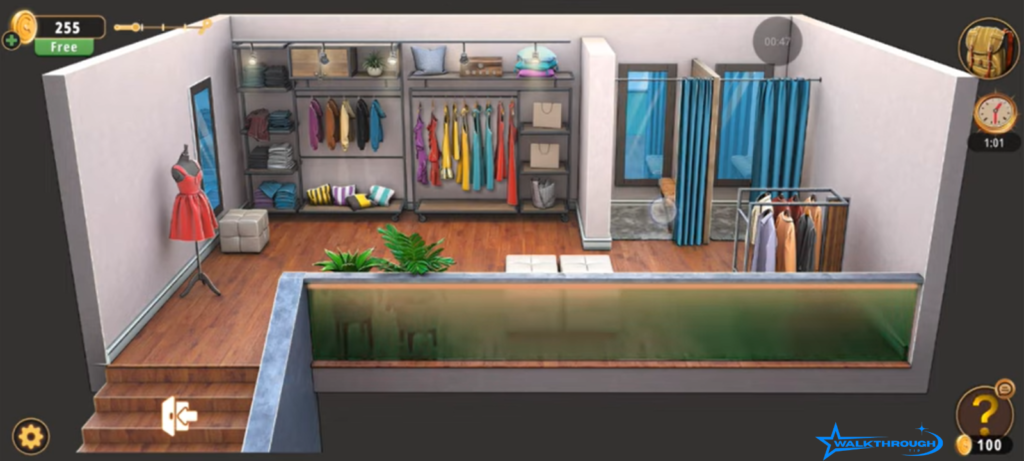
2. Finding Puzzle Pieces
With the mannequins dressed, new areas become accessible. You must locate two puzzle pieces hidden in distinct store sections.
A. Second Room Exploration
- Beyond the Mannequins lies a curtained doorway leading to a secondary showroom.
- Behind the Sofa: Near the cloth stand and ladders, tap the rear of the sofa to reveal Puzzle Piece #1 nestled in the upholstery.
- Curtain Alcove: Slide the heavy curtains aside to uncover a stylish hat while not a puzzle piece, this hat hints at your next styling task.
B. Main Room Retrieval
- Return to the Main Floor: Tap the central mannequin between the two you styled earlier.
- Result: Puzzle Piece #2 drops at its base.
Collecting these pieces demonstrates the importance of revisiting areas after completing initial tasks; once the mannequins are styled, their surroundings yield new secrets.
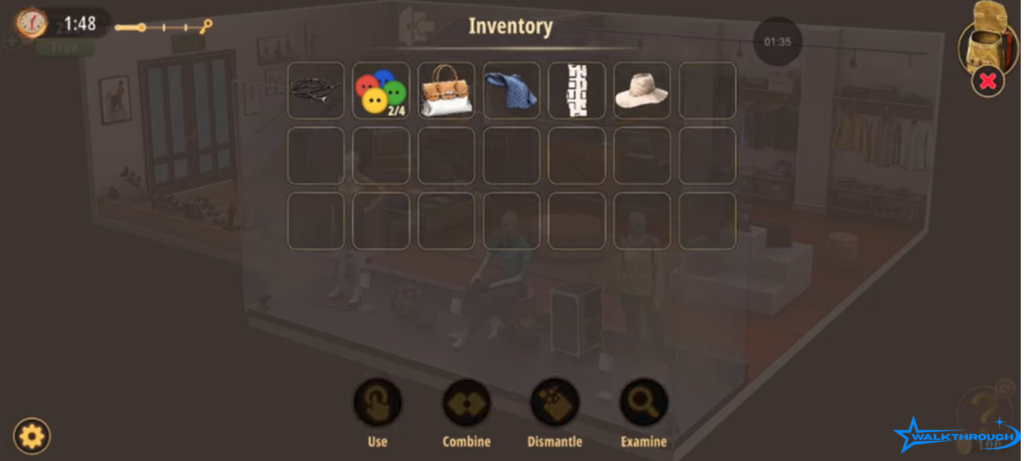
3. Unlocking the Locker
Armed with both puzzle fragments, it’s time to reveal the first code.
- Combine Pieces: Open your inventory, select Puzzle Piece #1, then tap Puzzle Piece #2 and hit Combine.
- Result: A four‑digit code 7035 materializes on the assembled fragments.
Head to the locker mounted above the left‑side cupboard:
- Action: Tap the locker’s keypad, input 7035, and press Enter.
- Reward: The door swings open to reveal three items, including a pair of designer shoes essential for a later footwear puzzle.
This stage underscores the Rooms & Exits principle of Combine: merging two disparate items to unlock critical codes.
4. Solving the Color Puzzle
Next, tackle the second locker to gather more fashion‑themed components.
- Location: Directly to the right of the first locker.
- Puzzle: Five colored squares await configuration.
Color Sequence:
- Yellow
- Light Blue
- Purple
- Red
- Yellow
- Action: Tap each square in the order above.
- Result: The locker unlocks, and you collect a shirt button, which will be used in a later board puzzle.
This puzzle leverages color‑pattern memory a common escape‑room mechanic that encourages players to note environmental color cues.
5. Gathering Buttons & Assembling the Board
With one button in hand, you’ll now collect three more to complete the button board puzzle.
A. Counter‑Area Button
- Location: On the counter beneath the display rack.
- Action: Tap the counter to reveal a yellow button nestled under a cloth.
B. Coat Rack Button
- Location: Second cloth rack from the right, near the ladder.
- Action: Collect a pair of scissors from a coat pocket, then use them to cut loose a blue button sewn into a jacket seam.
C. Mannequin Drawer Button
- Location: In the drawer beneath the central mannequin.
- Action: Use the previously collected shirt button to unlatch the drawer and extract a red button.
Once you have four buttons (yellow, light blue, purple, red), approach the button board on the wall next to the counter:
- Action: Drag and drop each button into its matching colored slot.
- Result: A hidden compartment opens, revealing a shoe puzzle component.
This multi‑step process highlights how Rooms & Exits intertwines item collection with inventory combination, ensuring every tool has a purpose
6. Shoe Rack Puzzle
The newly revealed shoe piece completes the footwear puzzle:
- Location: On the shoe rack adjacent to the button board.
- Action: Place the designer shoe from the locker onto the empty slot.
- Mechanic: Adjust three dials beneath the rack each dial corresponds to a style icon (heel, sole, strap). Rotate until all three icons light up green.
- Result: A small panel opens, dispensing a paper fragment with a numeric hint.
This puzzle tests your ability to interpret icon‑dial interfaces and underscores the need to pay attention to the shapes and positions of decorative store items.
7. Using the PC & Retrieving the Receipt
Armed with the new hint, head to the fashion store’s PC on the back counter:
- Action: Tap the PC screen and enter the price indicated on the paper fragment (e.g., $129.99).
- Result: A receipt prints out, listing item codes that will guide you through a mini‑game.
Next, initiate the mini‑game:
- Action: Tap the blank panel behind the counter, then insert the receipt.
- Objective: Rearrange colored blocks on a 3×3 grid to match the shapes printed on the receipt.
- Result: Upon completion, you receive a barcode scanner a key tool for the final puzzle.
This segment blends digital code entry with grid‑matching gameplay, adding variety to the fashion store’s puzzle lineup.
8. Final Steps & Escape
In the home stretch, you’ll assemble the barcode scanner and scan your receipt to reveal the final escape code:
- Assemble the Scanner
- Action: Open your inventory, select the barcode scanner and the wire (found inside the PC’s wiring panel earlier), then tap Combine.
- Result: A fully functional scanner appears.
- Action: Open your inventory, select the barcode scanner and the wire (found inside the PC’s wiring panel earlier), then tap Combine.
- Scan the Receipt
- Location: Back at the counter’s scanning stand.
- Action: Place the scanner on its mount, then select the receipt in your bag and tap Use on the scanner.
- Result: The scanner beeps and displays a six‑digit code 30015.
- Location: Back at the counter’s scanning stand.
- Exit the Store
- Action: Approach the main door’s keypad, input 30015, and press Enter.
- Result: The door unlocks, and you make your triumphant escape from the fashion store.
- Action: Approach the main door’s keypad, input 30015, and press Enter.
This climactic sequence ties together every tool, clue, and puzzle you’ve encountered, rewarding meticulous exploration and logical deduction .
Items & Locations Table
| Item | Found At | Purpose |
| Handbag | Sofa | Extract scarf |
| Scarf | Dismantle handbag | Dress mannequin |
| Puzzle Pieces #1–2 | Behind sofa (second room), central mannequin | Combine to reveal code 7035 |
| Locker 1 (7035) Items | Above cupboard (first locker) | Designer shoes, additional clues |
| Shirt Button | Second locker (color puzzle) | Button board puzzle |
| Yellow Button | Counter beneath display | Button board puzzle |
| Blue Button | Coat rack (cut with scissors) | Button board puzzle |
| Red Button | Mannequin drawer | Button board puzzle |
| Shoe Component | Locker 1 | Shoe rack puzzle |
| Paper Fragment | Shoe rack panel | Receipt price for PC code |
| Receipt | PC | Mini‑game grid puzzle |
| Barcode Scanner | Mini‑game reward | Final code scanner |
| Wire | PC wiring panel | Assemble scanner |
| Exit Code (30015) | Scanner result | Unlock exit door |
Expert Tips & Tricks
- Zone‑Based Clearance
Tackle the fashion store in zones main floor (mannequins, lockers, button board), then the second room to ensure no item is overlooked. - Inventory Proficiency
Master the four bag functions Use, Combine, Dismantle, Examine to streamline interactions and avoid frustration. - Visual Cue Awareness
Colors, icons, and shapes on mannequins, lockers, and puzzles are deliberate hints. Pay attention to repeated motifs (e.g., scarf color matching locker hues). - Pattern & Sequence Memory
Whether dialing color squares or arranging desserts, memorize short sequences immediately; writing them down can help in complex levels. - Revisit After Puzzle Completion
Once a puzzle (like dressing mannequins) is solved, re‑scan that area for newly unlocked items Rooms & Exits frequently reveals secrets in previously explored spots.
Conclusion
Rooms & Exits Level 7 – Fashion Store weaves together styling challenges, color puzzles, and culinary‑style mini‑games into a seamless escape‑room tapestry. By following this in‑depth guide dressing mannequins, collecting buttons, cracking locker codes, and scanning your way to freedom you’ll master every twist and turn of the fashion world. Armed with these strategies, you’re ready to strut through the exit door and onto Level 8. Good luck, and happy escaping!