Welcome to Walk Through Tip, your ultimate resource for in-depth game guides and walkthrough tips. In this post, we provide a comprehensive guide for mastering one of the most challenging levels in the popular puzzle game Rooms&Exits the Toy Store challenge from Chapter 1 Level 29. Whether you’re new to the game or a seasoned player needing fresh insights, our detailed rooms and exits walkthrough is designed to help you navigate puzzles, decode clues, and efficiently manage your in-game inventory.
Table of Contents
1. Game & Level Background
1.1 About Rooms&Exits
Rooms&Exits is a highly engaging escape room puzzle game renowned for its detailed levels, cleverly hidden objects, and mind-bending puzzles. The game challenges players to observe closely, gather subtle clues, and combine various items in an unusual inventory system known as the “bag.” Unlike standard inventory systems, the bag requires you to use actions such as Use, Combine, Dismantle, and Examine to successfully solve puzzles and escape each themed room. With its blend of mystery and interactive environments, Rooms & Exits keeps you on your toes at every level.
1.2 Level Context – Chapter 1 Level 29 (Toy Store)
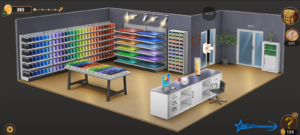
Chapter 1 Level 29 takes place in a vibrant Toy Store, where everyday toy items are transformed into critical clues that lead to your escape. This level is not just about finding objects; it’s about understanding their context in a cluttered, interactive environment. Key elements of this level include:
- Puzzle Variety: The level challenges you with multiple puzzles that involve collecting broken items, merging parts, and deciphering hidden messages.
- Inventory Management: Efficiently using the bag to store, combine, and activate objects is essential for progressing in the game.
- Thematic Clues: The toy store setting uses everyday objects in creative ways, such as a broken hairdryer paired with a flag alphabet, that must be interpreted to reveal passwords and instructions.
Because a single misstep can leave you stuck, this walkthrough is designed to ensure that you have a clear roadmap to follow and that every clue is explained in detail.
2. Tools and Preparation
Before you jump into the walkthrough, it’s important to familiarize yourself with the in-game tools and prepare with a few helpful strategies.
2.1 In-Game Tools
Rooms&Exits uses a unique bag system instead of a traditional inventory display. Every collected item is stored here, and you interact with objects using four primary actions:
- Use: Activates an item to perform a specific action when tapped on the correct object.
- Combine: Merges two separate objects into a complete tool, such as combining two half-dart pieces to form a whole dart.
- Dismantle: Opens boxes or packages to reveal hidden objects, like breaking open a hairdryer to retrieve a vital cord.
- Examine: Allows you to inspect objects more closely to gather subtle clues that might otherwise be overlooked.
Below is a simple table summarizing these actions:
| Action | Description |
| Use | Interact with or activate an item in the environment. |
| Combine | Merge two items to create a needed object. |
| Dismantle | Break open or deconstruct an object to access hidden components. |
| Examine | Look closely at an object to discern any clues or hidden information. |
2.2 Tips Before You Start
To maximize your chances of success, consider the following preparatory tips:
- Save Progress Regularly: If the game offers a checkpoint or save option, use it before approaching challenging segments.
- Manage Your Energy: Each level consumes a certain amount of energy. Avoid unnecessary actions to conserve energy for tougher puzzles.
- Be Observant: The game hides many clues in unexpected places. Look for interactive objects that respond to your taps or change appearance.
- Keep Notes: Jot down any codes, patterns, or sequences you encounter. This is especially useful when dealing with multi-step puzzles.
- Stay Patient: Some puzzles require trial and error. Learning through each attempt is part of the gaming experience, so remain calm and methodical.
3. Detailed Walkthrough – Step-by-Step Solutions
Below is a detailed, step-by-step guide for Rooms&Exits Toy Store Chapter 1 Level 29. Follow these instructions carefully to ensure you don’t miss any important clues or steps.
3.1 Initial Exploration and Clue Collection
Step 1: Start with Exploration
Begin by thoroughly examining the room. Upon entering the level, your primary goal is to identify interactive objects:
- Broken Hairdryer and Flag Alphabet:
Under the registry, you will find a broken hairdryer. Alongside it, a flag alphabet is also present. Tap on the flag alphabet to add it to your bag this will be essential later for decoding messages.
Step 2: Interact with the Toy Truck
- Collect the Red Triangle:
Locate the toy truck positioned near the helicopters. Tapping the truck will yield the red triangle. This item plays a pivotal role when interacting with other clues later on. - Scan Nearby Elements:
Once you have the red triangle, check around the truck for additional hints or items that may appear once the triangle is collected.
3.2 Early Puzzle Mechanics and Collecting Key Items
Step 3: Open Drawers and Inspect Shelves
- Drawer Under the Wooden Figure:
Find the drawer located beneath a wooden figure. Opening this drawer will allow you to collect two essential items a half dart and a handle. - Shelves on the Wooden Tree:
Look up at the wooden tree shelves nearby. Here, you’ll find a bell pepper and another piece of the dart. Tap each item carefully to add them to your inventory.
Step 4: Combining Objects
- Merge Dart Pieces:
Using the “Combine” option in your bag, merge the half dart from the drawer with the additional dart piece from the shelves. This creates a complete dart. - Using the Complete Dart:
Once assembled, use the complete dart on the red balloon situated at the far end of the level. Popping the balloon will reveal an important note containing further clues.
3.3 Decoding Clues and Progressing Through Puzzles
Step 5: Decipher the Note
- Read and Analyze the Note:
After popping the red balloon with the dart, a note is revealed. Read this note carefully it contains hints for subsequent steps. - Interacting with the Toy Truck (Second Instance):
Return to the toy truck area, specifically the one located near Rubik’s cubes. Tap on it and use the red triangle in conjunction with the information from the note. This interaction rearranges figures in their proper order.
Step 6: Acquiring the Tubular Key
- Collect the Tubular Key:
Once the figures are correctly aligned, a tubular key will become available. Tap to add it to your bag. - Using the Key on the Wooden Figurine:
Locate the wooden figurine and select the tubular key from your inventory. Tap on the figurine to use the key, triggering the next phase of the level.
Step 7: Decoding with the Flag Alphabet
- Reveal the Hidden Message:
With the tubular key in your bag, combine its use with the flag alphabet you previously collected. This action deciphers a message that spells “TRAIN,” a password that becomes crucial for further puzzles.
3.4 Managing Mid-Level Puzzles and Inventory Tasks
Step 8: The Hairdryer Puzzle and Panel Activation
- Dismantle the Broken Hairdryer:
Return to the broken hairdryer and select the “Dismantle” action. This process extracts the cord from the device. - Panel Interaction:
Use the cord on a nearby panel. Once connected, a virtual keyboard will appear. Type the password “TRAIN” to unlock an adjacent door and progress further into the level.
Step 9: Exploring the Green Shelves and Dolls Section
- Rearranging Items on the Green Shelves:
Next, head to a set of green shelves where several dolls are displayed. Move the bottom middle doll aside to reveal additional hidden items. - Collecting Additional Clues:
From this area, pick up a crumbled paper and a pear. Pay careful attention to the color patterns on the shelves these details will be integral later:
- Top Row Colors: Orange, Yellow, Dark Red
- Bottom Row Colors: Light Red, Purple, Green
- Top Row Colors: Orange, Yellow, Dark Red
- Observing Stuffed Toys:
Examine the stuffed toys on the purple shelves. Notice how the pink ones change their gaze in a specific order (counterclockwise, then clockwise, then counterclockwise), which hints at the next phase of the puzzle.
Step 10: Inter-Room Movements and Mini-Games
- Opening a Circular Box in the First Room:
In the first room, locate a circular box surrounded by stuffed toys. Use the handle from your inventory to open it. Inside, you’ll find building cubes and grapes. - Transitioning to the Second Room:
Move to the second room, marked by green shelves. There, place the bell pepper, grape, and pear in a designated toy fruits and veggie stall. The items must be arranged in the correct order based on the doll pattern you observed earlier. This action reveals yet another clue above the stall.
3.5 Advanced Puzzles and the Final Escape
Step 11: The Towel and Cleaning Spray Puzzle
- Collecting Crucial Items:
Find the yellow towel located near the toy fruits and veggie stall. Then, proceed to the toy house where you will retrieve a yellow switch. - Lighting the Correct Lamps:
Inside the toy house, a photo hint displays suns. Light only the lamps that match the visual cue. If done correctly, you will collect a comb along with another key. - Combining Crumbled Papers:
Use the comb on a doll’s hair. This action uncovers an additional piece of crumbled paper. Merge this with the earlier collected piece to form a consolidated hint note.
Step 12: Mirror Cleaning and Final Code Entry
- Tile Puzzle on the Wall:
Return to the wall with a decorative frame of tiles. Tap the tiles until the pattern displayed matches the one in your hint note. - Gathering Building Blocks and Cleaning Spray:
Meanwhile, collect the building blocks along with a glass cleaner spray. These items will be used to clean a mirror. - Cleaning the Mirror:
Open the heart-shaped box on the countertop using the key that you now possess. Combine the yellow towel and the cleaning spray to wipe the mirror inside, revealing a hidden pattern. - Entering the Final Pattern Code:
Transfer the discovered color pattern to a locked door. The correct sequence is as follows:
- Row 1, Tile 4: Blue
- Row 2, Tile 1: Purple
- Row 2, Tile 3: Pink
- Row 3, Tile 1: Red
- Row 4, Tile 2: Green
Enter this code to unlock the door and set the stage for the final challenge.
- Row 1, Tile 4: Blue
Step 13: Final Train Puzzle and Escape
- Interacting with the Red Cars and Toy Train:
Once the door is open, tap on the shelf where two red cars are present. Flip an in-game switch and return to observe the room fully illuminated the train now becomes visible on the floor. - Using Inventory Items to Activate the Toy Train:
Dismantle the building blocks in your bag and rearrange them according to the reference photo provided within the level. Then, use the yellow switch from your inventory on the toy train. This action reveals a hidden key. - Exiting the Level:
Finally, use the newly acquired key to unlock the exit door. This completes Chapter 1 Level 29, and you’re successfully on your way to mastering Rooms&Exits.
4. Additional Tips & Frequently Asked Questions
4.1 Common Sticking Points
- Misinterpreting Clues:
Interactive elements are often subtle. Focus on objects that change when tapped. Background elements might look important but are sometimes just decorative. - Efficient Inventory Management:
Keep close track of the objects in your bag. If you miss an item, retrace your steps to ensure nothing has been overlooked. - Correctly Combining Items:
When merging items such as the dart pieces, ensure that both parts have been fully collected from their locations. If a combination fails, recheck the objects to make sure they are the correct ones.
4.2 Frequently Asked Questions (FAQs)
What should I do if I can’t find the red triangle?
Revisit the area near the toy truck. Look carefully around the interactive elements; sometimes the red triangle may be obscured by other items or may require multiple taps before it appears.
How can I manage my energy more effectively?
Energy is crucial in Rooms&Exits. Save your energy by taking your time, avoiding unnecessary actions, and using hints sparingly. Keep an eye on your energy meter and prioritize challenging puzzles when you’re fully energized.
The color pattern on the shelves is confusing. Can you explain it?
Absolutely. In this level, the green shelves are organized in two rows. The top row should be:
• Orange – Yellow – Dark Red
And the bottom row should be:
• Light Red – Purple – Green
Write this down or take a screenshot to refer back when you need to input the code.
Do I need to replay any segments if I make an error?
Yes. If you input the wrong code or combine items incorrectly, it might be necessary to replay that section. Maintaining patience and methodically rechecking clues will minimize these errors.
5. Visual Aids & Interactive Elements
Integrating visuals into your gameplay guide can further ease understanding and retention. Here are some ideas on how to enhance your walkthrough:
5.1 Screenshots and Diagrams
Create annotated screenshots to highlight key areas in the level. For instance, include images that demonstrate:
- The location of the broken hairdryer and flag alphabet.
- The toy truck area where the red triangle is located.
- The exact arrangement on the green shelves with the dolls and corresponding color codes.
A simple table to summarize key items may look like this:
| Item/Area | Location | Action Required |
| Broken Hairdryer | Under the registry | Tap to collect flag alphabet |
| Toy Truck | Near the helicopters | Tap to collect the red triangle |
| Wooden Figure Drawer | Beneath the wooden figure | Open to collect half dart & handle |
| Wooden Tree Shelves | Nearby the figure | Inspect to gather dart piece & bell pepper |
| Red Balloon | Far end of the level | Use dart to reveal a note |
| Green Shelves & Dolls | Central area of the level | Rearrange dolls; note color pattern |
5.2 Video Walkthrough
Consider embedding a video walkthrough to complement this guide. Visual content is often helpful, especially when dealing with intricate puzzles. A video can demonstrate how to tap items, combine objects, and input codes, offering an extra layer of clarity.
5.3 Flowcharts and Diagrams
Flowcharts can simplify the decision-making process. An illustrated flowchart may include nodes such as:
- Start Level → Collect Broken Hairdryer and Flag Alphabet → Tap Toy Truck → Gather Red Triangle → Open Drawer → Collect Dart Parts → Combine and Use Dart → Pop Balloon for Note → Continue with Remaining Steps.
These visual elements help break down the process and serve as a quick reference during gameplay.
6. Conclusion & Next Steps
6.1 Summary
Rooms&Exits Toy Store Chapter 1 Level 29 is a rich and multifaceted challenge that tests your puzzle-solving, observational skills, and inventory management. This walkthrough has provided detailed instructions from the initial exploration and early item collection to advanced puzzles involving decoding, mirror cleaning, and the final train puzzle. By following the steps in this guide, you now have a clear, actionable path to escape the level.
6.2 Next Levels Teaser
With Level 29 now behind you, get ready to face the next set of challenges in Rooms&Exits. In our upcoming guides, we will dive deeper into subsequent levels and explore additional puzzles and unique gameplay mechanics. Stay tuned for more walkthroughs and tips to help you conquer the remaining chapters.
If you found this guide helpful, please leave your comments and share any extra tips or strategies that worked for you. Your feedback helps build a strong community of escape room enthusiasts. Don’t forget to share this post on social media and bookmark Walk Through Tip for more detailed game guides.