Experience the thrill of “Nancy Drew: Warnings at Waverly Academy” with this in-depth walkthrough covering every chapter, puzzle, and secret. Whether you’re a veteran sleuth or a first-time player, our guide will help you solve the Black Cat mystery, ace your exams, and uncover every hidden detail at Waverly Academy.
Introduction to the Game
“Nancy Drew: Warnings at Waverly Academy” is the 23rd installment in the beloved Nancy Drew adventure series. Set against the backdrop of an elite girls’ boarding school, the game challenges players to find the culprit behind threatening notes signed by the “Black Cat.” Through a blend of exploration, puzzle-solving, and dialogue choices, you’ll uncover hidden passageways, navigate complex social dynamics, and ultimately reveal the mastermind. The immersive storyline, richly detailed environments, and cleverly designed puzzles make this Nancy Drew walkthrough essential reading for anyone seeking a complete Waverly Academy gameplay experience.
Getting Started – Installation and Game Settings
Before diving into the mystery, ensure a smooth start:
- System Requirements
- OS: Windows 7/8/10 or macOS 10.10+
- CPU: 2.6 GHz or higher
- RAM: 2 GB minimum
- Graphics: 256 MB VRAM
- OS: Windows 7/8/10 or macOS 10.10+
- Installation Steps
- Purchase/download from Big Fish Games or Steam.
- Run the installer and choose “Full Install.”
- Select desired language and resolution.
- Opt into tutorial messages if you’re new to Nancy Drew adventures.
- Purchase/download from Big Fish Games or Steam.
- Recommended Settings
- Graphics: Medium for balanced performance and detail.
- Sound: Stereo headphones for full immersion.
- Subtitles: On, to catch every clue.
- Graphics: Medium for balanced performance and detail.
Proper setup minimizes technical hiccups and ensures you don’t miss vital hints hidden in audio logs or visual cues.
Game Interface and Controls
Understanding the interface is crucial for a seamless Nancy Drew walkthrough:
- Main Screen Layout
- Inventory Bar: Bottom of the screen shows collected items.
- Dialogue Box: Top-left displays conversation choices.
- Task List: Press T to toggle objectives.
- Notebook: Press N to review clues and character profiles.
- Inventory Bar: Bottom of the screen shows collected items.
- Control Scheme
- Movement: Arrow keys or WASD.
- Interact: Left-click or E.
- Examine: Right-click highlights key objects.
- Journal Navigation: Page Up / Page Down.
- Movement: Arrow keys or WASD.
Familiarize yourself with these controls first particularly the Notebook and Task List as they’re referenced constantly in puzzle hints and dialogue branches.
Part 1: Welcome to Waverly
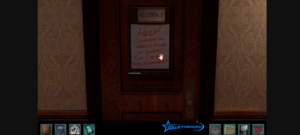
Nancy’s first moments on campus set the tone for the mystery: arriving by taxi, she explores the ivy‑clad Main Hall, picks up her orientation packet marked Welcome to Waverly, and learns the basic controls. A glance at the student noticeboard reveals the first Black Cat stencil, and chatting with the Dean unlocks her dorm assignment. These opening steps introduce the game interface, key locations, and the whispered rumors that drive the investigation forward.
Part 2: Rachel and Mel
Early conversations with Rachel Hubbard and Me Corbalis reveal two very different personalities and two potential suspects. Rachel, the talented art student, hints at hidden emotions in her sketchbook, while Mel’s prank‑filled commentary masks a deeper anxiety about the Black Cat’s threats. Balancing empathy and skepticism in these dialogues helps Nancy earn trust points and tease out the first real clues.
Part 3: Air Hockey
A friendly match in the Gymnasium doubles as a relationship test and a strategic puzzle: beating Izzy at air hockey not only nets extra relationship points but also unlocks a secret route later in the game. Corner shots, defensive blocks, and well‑timed speed bursts are the keys to victory. Mastering this mini‑game early pays dividends in both trust and access.
Part 4: DNA Project
In the Science Lab, Nancy must mix three chemicals Blue #5, Red #40, and Yellow #6 to synthesize a pigment sample matching those in the art studio. This hands‑on chemistry puzzle reinforces careful note‑taking: the resulting compound color directly ties into the stencil code. Solving the DNA project earns both a grade boost and a crucial paint‑mixing insight.
Part 5: Snack Shop, Orthographic Views
Working the Snack Shop teaches Nancy to juggle inventory management under time pressure, while a side puzzle in Orthographic Views challenges spatial reasoning: interpreting 2D blueprints of Waverly’s hidden passage. Quick restocking techniques and bulk order shortcuts keep customers happy, and mastering the blueprint puzzle unveils an alternate route to the Gym for later clandestine meetings.
Part 6: Rita Hallowell’s Journal, Talking to Ned
Discovering Rita Hallowell’s hidden journal in the Library sheds light on Waverly’s centuries‑old mysteries, and a call to Ned Nickerson provides tech support namely, unlocking a phone “Decode” app. Rita’s cryptic diary entries point toward midnight rendezvous spots, while Ned’s remote guidance on your phone helps translate ciphered texts into actionable clues.
Part 7: Playing Scram Against Leela
A logic‑based board game called Scram pits Nancy against resident math whiz Leela Yadav. Winning requires pattern recognition and forward planning, and victory deepens your rapport with Leela unlocking access to her private study notes. This cerebral mini‑game is a perfect foil to the art‑and‑chemistry puzzles, reinforcing the game’s variety.
Part 8: Rachel’s Projects, Tons of Texts
Rachel’s evolving art projects deliver both aesthetic pleasure and hidden messages: each new collage or painting may conceal Black Cat symbols or diary references. Meanwhile, your phone constantly pings with anonymous texts deciphering them in real time fills your Notebook with coordinates and riddles. Tracking these overlapping streams of information is vital to staying ahead of the culprit.
Part 9: Is Mel a Plagiarist?
An optional side quest examines Mel’s term paper for signs of plagiarism. By comparing her essay to archived library resources, Nancy uncovers suspiciously similar passages an investigative detour that yields both character insight and a red herring. This episode reinforces the importance of Library research and Notebook documentation.
Part 10: Piano Puzzle
In the Music Room, a locked cabinet requires solving a tonal sequence on the grand piano: listen closely to the school anthem and replay the first five notes. Getting the melody exactly right pops the lock and reveals a hidden ledger detailing late‑night Black Cat sightings. This auditory puzzle sharpens listening skills and ties into the game’s emphasis on detail.
Part 11: Climbing Trees, Day Two
A brief excursion onto the Waverly grounds challenges Nancy to climb a large oak and retrieve a hidden cache of key fragments lodged in a hollow branch. Timing and camera angle are crucial miss the jump and you’ll fall, costing time and relationship points. This outdoor challenge diversifies the mostly indoor exploration and rewards spatial awareness.
Part 12: Victorian Dining Puzzle
The elegant Dining Room hides a table‑setting puzzle: arrange silverware and china according to 19th‑century etiquette rules found in Rita’s journal. Success not only impresses the Dean at luncheon but also unlocks a locked drawer in the buffet, containing the master key to Mel’s room. This sequence weaves historical trivia into a practical payoff.
Part 13: The Blackwood Society
Late in the game, Nancy uncovers references to the secretive Blackwood Society a phantom alumni group rumored to enforce traditions by any means. Piecing together Society symbols embossed around campus explains the origin of the “Black Cat” moniker and raises the stakes: this is more than a prankster, it’s a clandestine organization with deep roots.
Part 14: United States Map
In the Library’s geography corner, a giant U.S. map puzzle must be completed by placing state-shaped tiles in the correct locations. Completing the map grants access to a locked atlas drawer, revealing a letter from an anonymous informant. This tactile geography exercise reinforces the game’s theme of hidden knowledge behind every clue.
Part 15: Rachel’s Secret, Starburst Puzzle
Rachel confides she’s been secretly messaging the Black Cat to protect her art collection. To verify her claim, Nancy tackles the “Starburst Puzzle,” aligning colored stars on a corkboard to spell out Rachel’s true motive. The solution clears Rachel’s name and redirects suspicion, demonstrating how puzzles can drive narrative twists.
Part 16: Pictures, Corine’s Essay
A stack of photographic negatives in the Art Studio prompts a darkroom puzzle: correct exposure times and developing chemicals reveal images of a clandestine meeting in the Gym. Simultaneously, Corine’s essay found in the Dean’s Welcome packet provides context for Waverly’s founding lore. Together, they deepen the backstory and sharpen the mystery.
Part 17: Furnace Puzzle
The Boiler Room hides a heat‑sensitive cipher: Nancy must adjust furnace levers to maintain three precise temperature ranges, causing hidden inks on a parchment to appear. Reading the revealed message points to a final confrontation location. This mechanical puzzle underscores the game’s love of multi‑step brainteasers.
Part 18: Black Cat Caught
In the climactic scene, you lead the culprit into the Gym’s secret chamber and present your evidence paint samples, decoded texts, and overheard whispers. A timed dialogue sequence lets you choose questions that unmask the true Black Cat, triggering the final cutscene. Successfully accusing the right suspect wraps up the investigation with praise from the Dean and optional epilogues for each friend.
Overview of Waverly Academy
Waverly Academy is a prestigious boarding school nestled in Vermont’s mountains. Its ivy-covered halls and manicured lawns hide centuries-old secrets. Key locations include:
- Main Hall: Central hub with student notice boards.
- Library: Research hub for puzzle clues.
- Dormitory Wing: Nancy’s quarters and roommate interactions.
- Art Studio: Site of the notorious “Black Cat” stencil.
- Science Lab: Contains chemical puzzles and experiments.
- Cafeteria & Snack Shop: Mini-games and social gatherings.
- Gymnasium: Air hockey challenge.
Each area features unique puzzles and NPC interactions some optional that enrich the Waverly Academy experience.
Main Characters You’ll Encounter
Building relationships is key to unraveling the Black Cat mystery. Here are the five main suspects:
| Character | Personality | Key Interactions |
| Rachel Hubbard | Artistic, secretive | Shares art studio clues; may lie under pressure |
| Mel Corbalis | Energetic, prankster | Sets traps in dorm; source of hidden notes |
| Izzy Romero | Sports captain, competitive | Challenges Nancy in air hockey; holds grudges |
| Leela Yadav | Overachiever, analytical | Offers logical insights; hides personal stress |
| Dana Somers | Friendly, gossip-prone | Spreads rumors; helps decode phone messages |
Talking to each character at critical junctures morning, afternoon, and evening unlocks new clues, side quests, and optional events that can change puzzle solutions or dialogue outcomes.
How the Black Cat Mystery Unfolds
At the heart of your Nancy Drew walkthrough is the Black Cat’s threatening notes. The antagonist uses three methods to deliver warnings:
- Stencil Prints: Found in the art studio and main hall.
- Anonymous Texts: Sent to Nancy’s cell phone after certain tasks.
- Letter Drops: Appearing under dorm room doors at midnight.
The chronology of these messages dictates your investigation sequence. Missing one can delay story progression, so refer to your Task List (T) to track each Black Cat event.
Arrival at Waverly – First Steps
Nancy’s introduction sets the tone for the walkthrough:
- Taxi Ride: Listen for background chatter about campus rumors.
- First Glimpse: Main Hall noticeboard displays class schedules and initial Black Cat image.
- Tutorial Tasks:
- Learn controls by picking up orientation packet.
- Speak to the Dean to receive your room assignment.
- Explore the Library to log your first clue in the Notebook.
- Learn controls by picking up orientation packet.
This opening scene establishes key mechanics stenciling, note tracking, and dialogue choices so pay attention to visual and audio hints.
Day 1: Settling In and Meeting the Girls
Objectives: Get acquainted with roommates, collect schedule, find stencil kit.
- Dormitory:
- Meet your roommate and choose one of three bios (this affects one late-game dialogue).
- Locate the stencil kit in the closet.
- Meet your roommate and choose one of three bios (this affects one late-game dialogue).
- Library Visit:
- Collect the class syllabus.
- Write down study group times in your Notebook.
- Collect the class syllabus.
- Art Studio:
- Find first Black Cat stencil under an easel.
- Examine paint samples note the distinct pigment code.
- Find first Black Cat stencil under an easel.
Tips:
- Talk to each girl twice to unlock side clues.
- Record every pigment code they’ll resolve a paint-mixing puzzle on Day 4.
Day 2: Completing Assignments and Investigating Clues
Objectives: Finish homework, decode phone message, gather item for chemistry lab.
- Science Lab:
- Mix three chemicals in order: Blue #5 → Red #40 → Yellow #6.
- Note resulting compound color to match paint pigments.
- Mix three chemicals in order: Blue #5 → Red #40 → Yellow #6.
- Cell Phone Alert:
- Receive anonymous text at 3 PM.
- Use phone’s “Decode” app (found in Snack Shop counter) to reveal map coordinates.
- Receive anonymous text at 3 PM.
- Afternoon Class:
- Attend study session with Leela; answer her logic puzzle to gain her trust (+10 relationship points).
- Attend study session with Leela; answer her logic puzzle to gain her trust (+10 relationship points).
List: Key Items for Day 2
- Chemistry vial (Science Lab)
- Cell phone decoder app
- Leela’s logic worksheet
Day 3: Secrets, Pranks, and Pressure
Objectives: Navigate dorm pranks, find hidden diary, complete art assignment.
- Prank Cleanup:
- Mel floods the hallway with water balloons.
- Find towels in the janitor’s closet (unlock with Master Key, obtained from Dean after Lab presentation).
- Mel floods the hallway with water balloons.
- Hidden Diary:
- Under floorboard in Rachel’s room; entry hints at a clandestine meeting in the gym.
- Under floorboard in Rachel’s room; entry hints at a clandestine meeting in the gym.
- Art Assignment:
- Create a collage using the Black Cat stencil.
- Choose one of three themes each reveals a different clue phrase, recorded automatically in your Notebook.
- Create a collage using the Black Cat stencil.
Tip:
- Saving before choices lets you explore alternate clue branches without losing progress.
Day 4: Uncovering Hidden Messages and Solving Conflicts
Objectives: Access secret passage, decrypt stencil code, reconcile with Izzy.
- Secret Passage Entrance:
- Behind the bookshelf in the Library.
- Use the cipher from Rachel’s diary to unlock (Caesar shift of +5).
- Behind the bookshelf in the Library.
- Stencil Decryption:
- Match pigment codes to chemical compound colors from Day 2.
- Combine codes in the stencil machine to reveal “MIDNIGHT GYM.”
- Match pigment codes to chemical compound colors from Day 2.
- Gym Showdown:
- Confront Izzy during her practice; win an air hockey match to earn her respect.
Day 5: Final Exams and Confrontation
Objectives: Cheat sheet heist, midnight rendezvous, unmask the Black Cat.
- Exam Preparation:
- Dana provides you with a partial cheat sheet decide to use it (easier route) or rely on your notes (honor route).
- Both choices lead to different dialogue outcomes but converge at the final challenge.
- Dana provides you with a partial cheat sheet decide to use it (easier route) or rely on your notes (honor route).
- Midnight Gym Meet:
- Navigate to the Gym through the secret passage.
- Avoid security cameras by following the blueprint in the Notebook.
- Navigate to the Gym through the secret passage.
- Unmasking Ceremony:
- Trigger cutscene.
- Choose dialogue options to accuse the correct suspect based on gathered evidence.
- Trigger cutscene.
Solving the Mystery – Ending Explained
How it concludes depends on your choices:
- Honesty Ending: Nancy solves the mystery without using the cheat sheet receives praise from the Dean and highest relationship points.
- Shortcut Ending: Using the cheat sheet speeds up confrontation but lowers Nancy’s integrity score; results in a more ambiguous cutscene.
A table of endings:
| Ending Type | Requirements | Outcome |
| Honesty | Don’t use cheat sheet | Full credit, bonus character epilogues |
| Shortcut | Use cheat sheet at exam | Quicker resolution, lower integrity bar |
All Puzzle Solutions with Logic
Below is a concise table of every major puzzle and the step-by-step logic:
| Puzzle | Location | Solution Steps |
| Chemistry Color Mixing | Science Lab | Blue #5 + Red #40 → Purple; Purple + Yellow #6 → Brown; matches pigment code |
| Cipher Wheel (Diary Entry) | Secret Passage | Caesar shift +5 on “BLACKCAT” → “HNFHPFHX” decode to library passcode |
| Paint Pigment Puzzle | Art Studio | Match pigment codes to chemical compound colors from lab for stencil reveal |
| Air Hockey Challenge | Gymnasium | Aim for corners; use fast pucks to break through Izzy’s defense |
| Snack Shop Combination Lock | Snack Shop | Order items by price: Candy ($1) → Soda ($2) → Chips ($3) → Chocolate ($4) |
Secret Room and Bonus Hidden Scenes
Uncover the Dean’s Office Safe:
- Find three key fragments:
- Under cafeteria table.
- Inside library globe.
- Taped behind Rachel’s painting.
- Under cafeteria table.
- Assemble keys to open safe.
- Watch bonus cutscene revealing Dean’s hidden connection to the Black Cat.
Secret scenes reward an exclusive concept art gallery and deeper backstory on Waverly’s founding.
Earning Stars and Keeping Your Grades Up
Grades at Waverly Academy unlock new dialogue options and side quests. Star system:
- Gold Star: Perfect exam score.
- Silver Star: One wrong answer.
- Bronze Star: Two or more wrong answers.
Tips to maximize stars:
- Complete optional mini-games (air hockey, snack shop).
- Study logic puzzles in your Notebook.
- Revisit lectures in the Library audio logs.
Relationship Tips – Building Trust with Students
Your interactions shape how characters assist you:
- Rachel: Praise her artwork; ask open‑ended questions.
- Mel: Laugh at her jokes (occasionally) but call out pranks calmly.
- Izzy: Compliment her athleticism post‑match.
- Leela: Discuss logic puzzles and science topics.
- Dana: Show interest in gossip she’ll reward you with hidden clues.
A list of dialogue triggers:
- “Ask about family” → unlocks Dana’s rumor vault.
- “Discuss pigments” → gains Rachel’s trust.
- “Challenge on trivia” → levels with Leela.
Snack Shop Duty – How to Do It Fast
The snack shop mini‑game involves restocking items and serving orders under a time limit. Quick method:
- Memorize three item locations: Candy, Soda, Chocolate.
- Drag multiple items at once by clicking and holding the shelf icon.
- Use Spacebar to confirm bulk orders.
Completing this yields a bonus logic clue hidden in the cash register.
How to Win Air Hockey (Mini-Game Tips)
Beating Izzy requires strategic puck control:
- Corner Shots: Aim diagonally for guaranteed goals.
- Defensive Blocks: Position the paddle at the center until she strikes.
- Speed Burst: Hit the puck along the top rail to confuse Izzy’s tracking.
Winning air hockey not only earns relationship points but opens an alternate way into the Gym after hours.
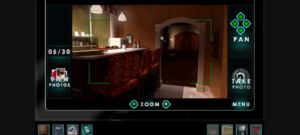
Cell Phone Tricks and Bonus Features
Nancy’s phone offers more than calls:
- Decode App: Translates ciphered texts.
- Camera: Scan hidden QR codes around campus to unlock easter eggs.
- Voice Recorder: Capture ghostly whispers in the Library for secret audio logs.
Use the phone to back up Notebook entries prevent loss if you accidentally overwrite clues.
Strategy Tips for First-Time Players
- Save Early, Save Often: Five slots available; use them liberally.
- Explore Thoroughly: Many hidden items and dialogues are off the main path.
- Check the Notebook Daily: It auto‑logs every clue review it before ending each day.
- Balance Academics & Investigation: Neglecting grades closes off helpful side quests.
Missable Events and Optional Dialogues
Some clues only appear at certain times:
- Midnight Cafeteria Chat: Leads to a rare Dean backstory flash.
- Rainy Afternoon in Art Studio: Triggers a secret stencil puzzle.
- Post‑exam Celebration in Main Hall: Grants Izzy’s bonus weapon tip.
Keep track of event times in your Notebook’s “Schedule” tab to avoid missing these.
List of All Collectibles and Hidden Items
| Item | Location | Reward |
| Dean’s Key Fragment (3×) | Cafeteria, Library, Dorm | Access to safe & bonus scenes |
| QR Code Fragments (5×) | Around campus murals | Exclusive audio logs |
| Exclusive Concept Art Page | Complete all stars | Visual gallery unlocked |
| Ghost Whisper Recording | Library at midnight | Secret lore entry |
| Secret Map Blueprint | Snack Shop counter drawer | Simplifies secret passage route |
All Achievement Tasks and Checklist
- Sleuth Supreme: Complete without hints.
- Academic Ace: Earn Gold Stars on all five exams.
- Social Butterfly: Max out relationships with all five students.
- Puzzle Master: Solve every puzzle on first attempt.
- Explorer: Discover all hidden rooms and items.
Use this checklist to track your 100% completion progress.
Game Over Scenarios – What Not to Do
- Ignore Exam Deadlines: Failing an exam locks certain side quests.
- Miss the Midnight Gym Slot: Blocks final confrontation route.
- Overwrite Saves: Losing key evidence can force a restart.
- Confront Wrong Suspect: Results in an immediate “Game Over” cutscene.
Always keep at least one early save and one just before major events.
Fun Easter Eggs and Developer References
- Hidden Pen Pal Letters: References to original 1995 Nancy Drew titles.
- Portrait of Carson Drew: Nancy’s father appears briefly in a painting.
- “House of Wax” nod: Wax museum booklet hidden in Library shelf.
These little touches reward longtime fans and deepen the Waverly Academy lore.
Comparison with Other Nancy Drew Games
| Aspect | Warnings at Waverly Academy | Sea of Darkness | Shadow at the Water’s Edge |
| Setting | Girls’ boarding school | Portuguese archipelago | Japanese-themed island |
| Puzzle Complexity | Medium–High | High | Medium |
| NPC Interaction Depth | Very High | High | Medium |
| Replay Value | Multiple endings & side quests | Multiple suspects | Fixed mystery |
| Visual Style | Ivy‑covered halls & art deco | Gothic & nautical | Modern & mystical |
“Warnings at Waverly Academy” stands out for its campus‐centric social dynamics and multiple endings, making it a top choice for players seeking both puzzle depth and character-driven storytelling.
Frequently Asked Questions (FAQs)
Q1: How do I get past the Secret Passage if I lose the cipher?
You can revisit Rachel’s art studio and re‑examine her diary. It automatically re‑logs the shift key in your Notebook.
Q2: Can I play mini‑games after finishing the main story?
Yes return to the main menu and choose “Free Play” to access air hockey and snack shop at any time.
Q3: Are there multiple Black Cat suspects?
No only one culprit, but several red herrings designed to mislead you.
Technical Issues and How to Fix Them
- Game Crashes on Startup:
- Update graphics drivers.
- Run as Administrator in Windows.
- Update graphics drivers.
- Audio Glitches:
- Disable sound enhancements in OS settings.
- Switch between stereo and surround profiles.
- Disable sound enhancements in OS settings.
- Mouse Lag:
- Lower graphics from Ultra to Medium.
- Close background applications hogging CPU.
- Lower graphics from Ultra to Medium.
Learn more about Fran Bow Walkthrough
Final Thoughts and Replay Value
“Nancy Drew: Warnings at Waverly Academy” masterfully blends engaging puzzles with rich character interaction and multiple endings, making it one of the most replayable titles in the series. Whether you’re chasing every hidden clue, striving for academic perfection, or simply savoring the campus atmosphere, this walkthrough ensures you experience the game’s full depth. Gather your stencil kit, charge your cell phone, and step into Waverly Academy mystery awaits at every corridor.