Introduction to Machinika Museum
Machinika Museum plunges you into the role of a specialist conservator in a futuristic space museum, where enigmatic alien devices arrive daily for study. Developed by Littlefield Studio, this sci‑fi puzzle game challenges you to examine, dismantle, and repair artifacts using logic, observation, and a versatile 3D printer. From the moment you activate your first device, you’ll navigate layered interfaces, decode alien glyphs, and piece together mechanisms unlike anything on Earth. The narrative unfolds silently through each machine’s inner workings, rewarding those who pay attention to mechanical detail and environmental storytelling. As you progress through seven chapters of escalating complexity, you’ll not only master a variety of puzzle types button sequences, gear alignments, circuit routing but also uncover the hidden story behind the museum’s mysterious benefactor and the true purpose of these extraterrestrial objects.
Navigating the Interface
Before diving into the chapters of alien enigmas, it’s crucial to become fluent with Machinika Museum’s user interface. The HUD is minimal: an inventory bar at the bottom, a schematic overlay for active devices, and contextual cursors that shift from pointer to grab‑hand as you hover over interactive zones. Learning to toggle the scanner view highlighting glyphs and stress fractures on device surfaces will save you countless backtracks. Menu navigation is streamlined, but don’t underestimate the importance of the journal feature, which logs discovered glyph patterns and custom‑printed parts. A solid grasp of the interface ensures you spend more time solving puzzles and less time hunting for clues.
Controls Overview
On PC, point‑and‑click with your mouse: left‑click to interact, right‑click to rotate objects in 3D space, and scroll to zoom. Mobile offers intuitive touch controls: tap hotspots, pinch‑to‑zoom for close inspection, and two‑finger drag to rotate artifacts. Console players use the right thumbstick for rotation, triggers for context‑sensitive actions, and face buttons to select inventory items. Regardless of platform, the key is learning the micro‑gestures double‑taps reveal hidden compartments, and long‑presses engage the scanner. Mastering these control nuances drastically speeds up your workflow and cuts down on frustration.
Inventory Management
Your inventory in Machinika Museum is deceptively simple: a horizontal rack that holds tools (screwdrivers, tweezers, mini‑camera) and custom‑printed components side by side. Selecting an item highlights relevant hotspots on the active device. You can combine printed parts with found fragments by dragging one onto the other essential when reconstructing missing gears or lenses. To avoid clutter, the game auto‑archives unused components into a “storage” submenu, but you can always retrieve them with a single click. Efficient inventory management means knowing which tool to equip before examining a puzzle, reducing unnecessary close‑ups and streamlining each chapter’s progression.
Zoom and Inspection Tools
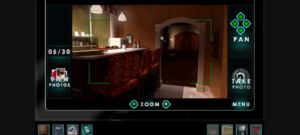
Close inspection is the foundation of every Machinika puzzle. The scanner mode outlines critical glyphs and fractured seams in neon blue, guiding your attention to hidden screws or pressure plates. Zoom unlocks a magnified view where minute details like micro‑etchings on a gear rim become legible. The mini‑camera tool, introduced in Chapter 3, lets you peer inside narrow shafts, revealing internal ratchets and wiring. Rotating objects along multiple axes often exposes secret latches or misaligned components. Taking full advantage of these inspection tools turns what might feel like pixel‑hunting into intelligent deduction, allowing you to anticipate puzzle solutions before diving into trial‑and‑error.
You can also read Painscreek Killings Walkthrough
Chapter-by-Chapter Walkthrough
Chapter 1: Initiation
In your first encounter with alien technology, you’re presented with a small, shutter‑like device that teaches basic mechanics: opening panels, rotating segments, and recognizing scanner highlights. The 3D printer enables you to replicate a missing cog by scanning an intact one and fabricating its mirror image. Once you slot the new cog into place, the device hums to life, revealing an inner glyph sequence. Translating those glyphs via your journal unlocks the chapter finale: a rotating disk puzzle where you align constellation symbols. This introduction cements foundational skills object manipulation, scanner usage, and part replication setting the stage for more intricate challenges ahead.
Chapter 2: The First Artifact
This chapter ups the ante with a larger, spherical mechanism embedded in a tripod. You’ll decipher alien script by matching cyan‑glow symbols on four rotating rings, then use the screwdriver tool to access hidden internal circuitry. A brief timed sequence appears: you must reconnect three colored wires before the device’s energy module overloads. Once stabilized, the sphere morphs into a lens that projects a holographic map revealing your next destination. Here, multi‑step logic, rapid tool swaps, and careful observation combine, teaching you to keep multiple clues in mind simultaneously rather than tackling puzzles in isolation.
Chapter 3: The Scroll Device
The “Scroll Device” resembles an ancient manuscript but is made of metallic plates. Engraved button arrays require input in a precise order, guided by faded glyph fragments in your journal. Mistakes trigger a reset, so patience and notation are key. A new mini‑camera tool allows you to inspect interior cogs once you remove the outer shell, uncovering a hidden ring puzzle at the core. Each ring carries unique glyphic patterns that must interlock perfectly. Completing this chapter reinforces the importance of cross‑referencing journal notes with in‑game visuals, as well as deftly managing tool‑driven sub‑interactions.
Chapter 4: The Mask
A biomechanical mask greets you in Chapter 4, its surface studded with gear‑driven rotating plates. You must align facial glyph patterns by manually rotating three concentric wheels until the mask’s “eyes” glow. The twist: each rotation also shifts hidden compartments on the mask’s edges, requiring you to open several hatches in sequence to retrieve mirror shards. A final engraving puzzle tracing a continuous line without lifting your stylus unlocks the mask’s smile, revealing a data chip. This chapter exemplifies multi‑layered puzzles where a single misstep in one phase can cascade, so methodical, modular problem‑solving is essential.
Chapter 5: The Ruby Necklace
Chapter 5’s alien necklace conceals a series of nested rings and retractable panels, all centered around a large, glowing ruby. You’ll first fragment a broken ring by scanning its shape, printing a replacement segment, and reassembling it. Next comes a planetary alignment puzzle: sliding three rings so that their etched moons and suns line up under specific markers. When complete, the ruby detaches, revealing a pressure‑sensitive grid inside the necklace’s clasp. Step on the correct sequence of tiles clues subtly etched into the chain links to complete the challenge. This chapter blends part fabrication, sliding‑ring logic, and pattern recognition in a single, elegant device.
Chapter 6: The Mechanical Heart
In Chapter 6, the device before you beats like an actual heart, its valves clicking as energy pulses through. Your goal is to reconstruct its internal circuitry: first by swapping out five corroded valve modules, then by routing power through a network of conduits. You must rotate connector blocks so that wires form an unbroken path from the energy core to the output port. A misaligned block triggers a short, forcing you to restart the alignment. Successful reactivation causes the heart to emit a soft glow and project a star chart on the wall your cue to move on. This puzzle teaches precision in component placement and reinforces the concept of flow‑based circuit logic.
Chapter 7: The Final Puzzle
The culmination of your museum apprenticeship is a colossal, multi‑component contraption combining every mechanic you’ve learned. A central hub features seven ring puzzles, each tied to one of the previous artifacts. Surrounding modules require gear synchronization, wire routing, and pressure‑plate activation. You must cycle between sub‑panels, noting how one ring’s rotation subtly shifts another module’s alignment. Patience and a systematic approach tackling one mechanism at a time while keeping a global view are paramount. When all elements click into place, the device splits open, revealing the museum’s greatest secret and concluding the narrative.
Essential Tips and Tricks
Solving the intricate puzzles of Machinika Museum can be both rewarding and mentally demanding. To enhance your gameplay and reduce frustration, it’s essential to apply certain strategic approaches consistently. These pro tips and tricks aren’t just for beginners they’re invaluable for players at all levels. Below is a breakdown of key strategies that will help you stay organized, solve puzzles more efficiently, and get the most out of the game’s unique mechanics.
🔍 Systematic Note-Taking
Keeping notes is a game-changer in Machinika Museum. The alien glyphs, symbol sequences, and positional alignments often repeat across puzzles. Writing down patterns, glyph translations, and specific gear alignments will help you quickly recognize solutions later. You can use a physical notebook or take screenshots as reference. It’s especially useful when you have to rotate multiple elements or re-enter codes you discovered earlier in the game.
🧬 Use Scanner Mode Frequently
Scanner mode is your best friend. It highlights invisible elements like hidden glyphs, stress fractures, and weak spots on the surface of devices. Always enter scanner mode before you begin manipulating any object. Many hidden compartments or clue fragments are nearly impossible to see in regular view. Regular use of this tool will prevent you from missing critical information and save you time retracing steps.
🎯 Master Micro-Gestures
The game’s controls are rich with subtle gestures that trigger important interactions. Double-tapping can reveal concealed panels, while long-pressing activates deeper scan results or tools. These micro-gestures are easy to overlook but are vital in progressing smoothly through more complex chapters. Practice these until they become second nature it can mean the difference between being stuck and moving forward with ease.
🖨️ Maximize Printer Efficiency
The 3D printer is one of your most powerful tools, but using it haphazardly can clutter your inventory and waste time. Always scan a complete, undamaged part before printing its replica. If you print without the full data, the resulting piece may be unusable, forcing you to repeat the process. Smart scanning ensures you replicate only what you need, maintaining clean and effective inventory management.
🧠 Take Breaks When Needed
It’s easy to get stuck on a tough puzzle or overthink a mechanic. If you find yourself going in circles, step away from the screen for a bit. A short break can reset your perspective and help you spot clues you may have previously overlooked. Mental fatigue is often the biggest obstacle in puzzle games, so know when to recharge your brain.
🧩 Progress in Order
Each chapter of Machinika Museum introduces new tools, mechanics, and journal entries that are often required in future puzzles. Skipping ahead or jumping chapters can leave you confused or under-equipped. Play the game in the intended sequence to ensure you have all the context, equipment, and lore necessary to solve increasingly complex challenges.
Applying these tips throughout your journey in Machinika Museum not only improves your efficiency but also deepens your appreciation for the game’s layered design. Whether you’re decoding symbols or reconstructing ancient machinery, these tricks will keep you focused, prepared, and ready to uncover every secret hidden in the alien artifacts.
Suggestions
Machinika Museum is a masterclass in environmental storytelling through puzzles. Each chapter builds on the last, gradually introducing new tools and mechanics while weaving a silent narrative about the alien devices’ origin. By mastering the interface, honing your inspection techniques, and methodically approaching each multi‑layered puzzle, you’ll not only repair every artifact but also piece together the museum’s hidden lore. Whether you’re a seasoned puzzle‑solver or new to the genre, this guide equips you with the strategies and insights needed to navigate every shuttered panel and whirring gear. Good luck, and may your curiosity drive you to unveil every secret this cosmic museum holds!