Welcome to our in-depth and comprehensive guide for the Rooms & Exits Fashion Store Walkthrough Chapter 1 Level 20. In this blog post, we’ll explore every corner of the level and share expert insights, detailed instructions, useful tips, and strategies to help you navigate the complex layout of the Fashion Store. Whether you are a newcomer or an experienced player, this guide is designed to provide you with the clarity and detailed knowledge needed to successfully complete this challenging level.
Introduction
The Rooms & Exits Fashion Store Walkthrough Chapter 1 Level 20 is one of the most challenging yet intriguing levels in the game. This level combines intricate design elements with puzzling layout configurations that require not only sharp observation but also a strategic approach to overcome the various obstacles. In this guide, we outline every essential detail you need to know, from the initial point of entry to the final exit, ensuring that you are well-prepared before you step into the game.
At the outset, it’s important to understand that each level in Rooms & Exits is designed with multiple layers of puzzles and hidden pathways. Chapter 1 sets the tone for the challenges ahead, and Level 20 in the Fashion Store is no exception. Here, you will encounter complex room structures, tricky environmental puzzles, and several secret exits that only the most observant players will find. Our walkthrough covers all these elements in depth, offering insights into the layout, objectives, and the strategic decisions that lead to success.
This guide is perfect for players looking to enhance their gameplay experience with:
- Comprehensive steps: Detailed instructions on every action required.
- Visual aid recommendations: Suggestions for screenshots, maps, and clues to help you visualize the level.
- Insider tips and expert tricks: Suggestions to avoid common pitfalls and gain the upper hand.
- User-friendly style: Simple, easy-to-read language ensuring that every player can follow along without confusion.
With this guide, you are not just following a checklist you are immersing yourself in the complete experience of the Fashion Store challenge, armed with knowledge and strategic foresight.
Level Overview
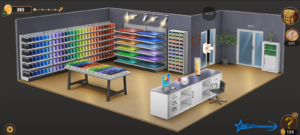
Fashion Store Layout and Theme
The Fashion Store level is designed to mimic a high-end boutique with a twist. Unlike a traditional store, this level features a labyrinthine structure with rooms that appear like showroom spaces, backstage dressing areas, and even secret corridors. The setting is both visually appealing and strategically complex. The careful placement of décor elements is not just for aesthetics each item might also act as a clue or a tool to progress further.
Objectives & Goals
At the core of the level, players are tasked with:
- Finding Clues: Identify hidden clues and messages that lead you to the secret exits.
- Solving Puzzles: Engage with interactive elements such as locked cabinets, hidden buttons, and coded displays.
- Navigating Complex Exits: Locate multiple exits and decide on the correct pathway that leads to the next phase of the game.
- Time Management: While there is no strict timer in this level, efficient resource management is key to conserving in-game resources like power-ups or limited tools.
Understanding these goals from the onset helps in planning your route and preparing for any curveballs the level might throw at you.
Table: Key Elements of the Fashion Store Level
| Element | Description | Purpose/Role |
| Entry Lobby | The starting area resembling a luxurious boutique foyer. | Introduces the theme; contains initial clues. |
| Showroom Spaces | Elegant sections filled with high-fashion outfits and accessories. | Houses several puzzles and interactive clues. |
| Dressing Rooms | Areas designed to mimic private fitting rooms. | Some puzzles require you to examine items here. |
| Secret Corridors | Hidden passageways behind decorative installations. | Accessed via hidden triggers and clever observation. |
| Exit Doors | Multiple potential exits, each behind unique puzzles or challenges. | Main objective: find and unlock the correct exit. |
Detailed Walkthrough (Step-by-Step)
In this section, we break down the walkthrough for the Fashion Store level, ensuring you have every detail required to navigate from start to finish. We’ve structured the guide into clear, manageable subsections.
Starting Out
Your journey begins as soon as you enter the level. The initial area, known as the Entry Lobby, sets the stage for all that follows. Here are some key points to note:
- Immediate Observations:
On entering the lobby, take a moment to observe the surroundings. The décor is opulent, with designer furniture and grand mirrors. Notice the placement of objects; sometimes, a seemingly decorative item might hide a crucial clue. - First Puzzle Prompt:
Shortly after entry, the game may prompt you to interact with a digital kiosk or a piece of modern art. Engage with it immediately as this initial puzzle is designed to familiarize you with the game mechanics for unlocking further areas. - List of Immediate Actions:
- Scan the Area: Walk around slowly and note any unusual objects or triggers.
- Interact with the Kiosk/Artwork: Look for a “start” icon or interactive element.
- Activate Hidden Clues: Sometimes, a brush stroke or a misplaced shoe near a rack can serve as the first clue.
- Scan the Area: Walk around slowly and note any unusual objects or triggers.
This proactive approach right from the start ensures you gather essential clues needed for later sections of the level.
Room-by-Room/Section Breakdown
The level is segmented into several key sections, each offering its own set of challenges and puzzles. Below is a comprehensive room-by-room breakdown:
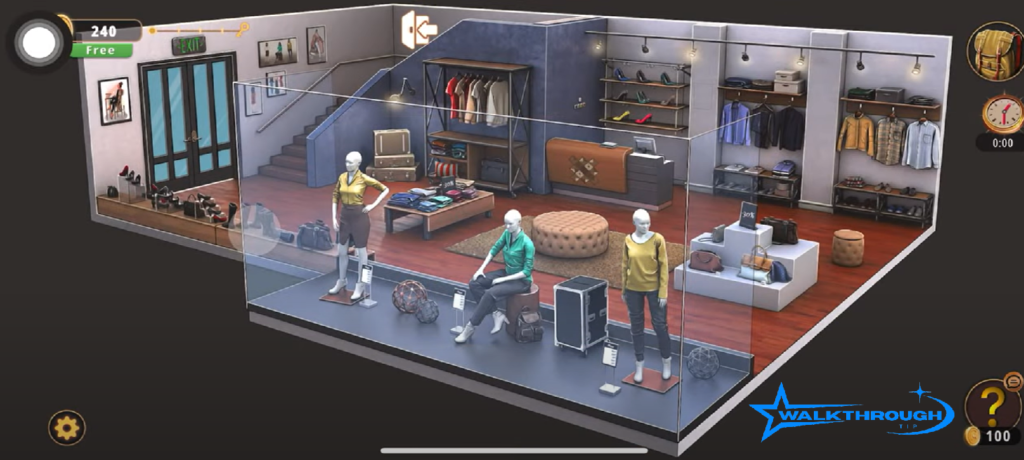
Room 1: The Entry Lobby and Initial Clues
- Layout and Description:
The Entry Lobby mimics a modern boutique with high-gloss floors and stylish displays. The room is well lit, and you’ll notice several objects such as benches, artistic installations, and a digital information screen. - Actions and Interactions:
- Digital Kiosk: Approach the kiosk immediately. The interface may require a basic interaction, such as pressing a button or entering a short code found on a nearby poster.
- Hidden Object: Look for a peculiar item on a console table often a key accessory like a fashionable hat or scarf that seems out of place.
- Digital Kiosk: Approach the kiosk immediately. The interface may require a basic interaction, such as pressing a button or entering a short code found on a nearby poster.
- Bullet-Point Steps:
- Examine the digital kiosk.
- Inspect unusual objects such as the console table item.
- Look behind the information screen for extra clues.
- Examine the digital kiosk.
Room 2: The Showroom Space
- Layout and Description:
After the lobby, you will move into a more expansive showroom. This room is filled with racks of designer clothing and model mannequins arranged in creative poses. - Puzzles and Interactions:
- Interactive Displays: Certain clothing displays might be interactive. For example, moving a particular item might reveal a hidden compartment.
- Visual Clues: Notice the unique pattern on the upholstery of a chair or a distinct logo that repeats on multiple garments – these are signals to look deeper into the details.
- Interactive Displays: Certain clothing displays might be interactive. For example, moving a particular item might reveal a hidden compartment.
- Steps to Follow:
- Walk slowly along the racks and inspect each display.
- Interact with any clothing items or accessories that seem interactive.
- Check behind items that seem out of place (e.g., a mannequin with an atypical pose).
- Walk slowly along the racks and inspect each display.
- Table: Interactive Elements in the Showroom
| Element | Clue/Function | Action Required |
| Clothing Rack | A hidden switch is often concealed among the garments. | Rearrange the clothing to trigger the mechanism. |
| Mannequin | Some mannequins hide interactive prompts behind them. | Inspect closely for a secret compartment. |
| Upholstery Pattern | Repeating patterns may form a numerical code. | Note down the numbers and check nearby panels. |
Room 3: The Dressing Rooms
- Layout and Description:
As you proceed further, the area transitions into a series of dressing rooms or private fitting areas. These rooms are dimmer, with the only light coming from elegant wall sconces. - Key Challenges:
- Hidden Compartments: Typically, dressing rooms contain hidden compartments behind mirrors or inside wardrobes.
- Puzzle Clues: Some of the clues revealed in the previous areas are often confirmed or connected to hidden doors in these rooms.
- Hidden Compartments: Typically, dressing rooms contain hidden compartments behind mirrors or inside wardrobes.
- Action Items:
- Open wardrobes carefully listen for subtle auditory cues such as a click or soft thud.
- Examine mirrors – sometimes, reflective surfaces have hidden messages or additional prompts.
- Look under furniture – a misplaced rug or a decorative bench might hide a small key or tool.
- Open wardrobes carefully listen for subtle auditory cues such as a click or soft thud.
Room 4: Secret Corridors and Hidden Passages
- Layout and Description:
The secret corridors represent the true challenge in this level. These corridors are designed to be less obvious, hidden behind decorative installations or concealed by sliding panels. - Strategies for Success:
- Environmental Cues: Pay attention to environmental details such as lighting changes, shadow directions, and sounds that might indicate hidden doors.
- Interactive Points: Look for panels or signs that hint at hidden mechanisms. They could be triggered by proximity or certain actions performed in adjacent rooms.
- Environmental Cues: Pay attention to environmental details such as lighting changes, shadow directions, and sounds that might indicate hidden doors.
- Steps to Discover the Hidden Path:
- Double-check each corner for sliding panels.
- Listen for any mechanical sounds that might indicate a door opening.
- Interact with decorative elements like wall art or ornate mirrors that might disguise the entrance to a secret corridor.
- Double-check each corner for sliding panels.
Room 5: Navigating the Exits
- Layout and Description:
The final segment of the level revolves around the exits. Unlike the preceding areas, the exits are guarded by more intricate puzzles and multiple potential pathways. - Detailed Instructions:
- Multiple Exits: While several exits may be visible, only one is the correct path to complete the level. Identifying the right exit requires carefully revisiting clues gathered from earlier rooms.
- Puzzle Complexity: This section involves solving a more complex puzzle which might blend clues from various parts of the level (e.g., codes from the digital kiosk combined with visual hints from the showroom).
- Multiple Exits: While several exits may be visible, only one is the correct path to complete the level. Identifying the right exit requires carefully revisiting clues gathered from earlier rooms.
- Critical Steps and Checks:
- Review Clues: Reassess all clues from the Entry Lobby, Showroom, Dressing Rooms, and Secret Corridors.
- Follow the Code: Apply any numerical or visual codes to the exit panel.
- Test Each Pathway: If unsure, methodically explore each potential exit by cross-referencing gathered clues.
- Review Clues: Reassess all clues from the Entry Lobby, Showroom, Dressing Rooms, and Secret Corridors.
- Bullet-Point Summary for Exit Navigation:
- Compile all discovered clues.
- Use a logical sequence to match clues with exit puzzles.
- Verify each potential exit by the provided instructions.
- Select the exit that fully aligns with the clues and proceed.
- Compile all discovered clues.
Tips & Tricks
In addition to the step-by-step walkthrough, here are some advanced tips and tricks to enhance your gameplay experience. Mastering these techniques can often be the difference between a smooth progression or getting stuck on a tricky puzzle.
- Stay Observant:
Often, the smallest detail a misaligned picture frame or a subtle change in wall color can be the clue you need. Train your eyes to spot these hidden signals throughout the level. - Take Notes:
Keep a notebook or digital note handy while playing. Document important numbers, visual cues, and even the order in which puzzles should be activated. A table like the one below can be invaluable:
| Clue | Location | Action/Result |
| Numeric Code “423” | Showroom Upholstery | Opens secret wardrobe compartment |
| Hidden Key | Behind the Mirror | Activates digital kiosk in lobby |
| Graphic Pattern | Mannequin Display | Triggers secret corridor mechanism |
- Efficient Resource Management:
Although there is no strict timer in this level, your in-game resources (such as power-ups, interactive hints, and special items) are limited. Use them sparingly by prioritizing their use only when you are absolutely stuck. Avoid expending them on puzzles that you might later solve by re-examining the environment. - Replay for Mastery:
If you get stuck, don’t be afraid to replay certain sections. Familiarizing yourself with the layout and the triggers can help you detect clues you might have missed the first time. - Collaborate with Others:
Join gaming communities and forums. Sharing insights and comparing strategies with other players can uncover novel approaches that you might not have considered. - Utilize Visual Aids:
If available, refer to in-game maps or screenshots. These visual cues can often provide a more comprehensive understanding of how rooms connect. Making annotations on these images will help you identify the location of hidden elements more quickly. - Practice Patience:
Some puzzles in Rooms & Exits are intentionally deceptive, designed to throw off your concentration. Take your time with each section, and if you feel frustrated, take a break. A fresh perspective may reveal what was previously overlooked.
Common Pitfalls and FAQ
Despite careful planning and attention to detail, many players encounter certain pitfalls in the Fashion Store level. Below, we address some common issues along with frequently asked questions to help you overcome these challenges.
Common Pitfalls
- Missing Hidden Clues:
Many players rush through the initial areas and end up missing subtle yet vital clues. Always take a moment to observe every nook and cranny in the room. - Overlooking Interactivity:
Not all objects in the level are decorative. Disregarding an object that looks out of place could mean missing an interactive element that triggers a hidden puzzle or exit. - Disorganized Clue Management:
Without keeping track of gathered clues and codes, it’s easy to confuse similar details. Documenting each clue as soon as you encounter it helps avoid the frustration of misplaced information. - Rushing Through Secret Corridors:
Secret passages require a deliberate search. Rushing through these areas might lead to missing important triggers or clues. Slow down and explore these corridors thoroughly.
Frequently Asked Questions (FAQ)
What should I do if I can’t find the exit?
If you’re struggling to locate the correct exit, revisit all previous rooms and re-read your notes. Often, the exit puzzle combines clues from multiple sections of the level. Compare your observations with the documented steps in this guide.
How can I avoid wasting in-game resources?
Plan your actions methodically. Use your hints and power-ups sparingly and prioritize solving puzzles with careful observation. Document and verify each clue before using any limited resources.
Why is the dressing room area darker than other areas?
The dim lighting in the dressing rooms is an intentional design to increase difficulty. It forces players to be extra vigilant about subtle cues such as reflections and quiet auditory hints.
Can I replay sections without restarting the entire level?
Yes, many game versions allow for replaying recent sections. Use this feature to reexamine any area where you believe you may have missed crucial details.
What if I encounter a glitch in the secret corridors?
Game glitches are rare but can happen. Check community forums or official game support for known issues or patch updates. Meanwhile, restarting the level might resolve the glitch and let you proceed normally.
Conclusion and Final Thoughts
In conclusion, the Rooms & Exits Fashion Store Walkthrough Chapter 1 Level 20 is a multi-faceted challenge that requires both strategic planning and acute attention to detail. This comprehensive guide has provided you with a structured approach to tackling the level. From the initial Entry Lobby to the secret corridors and ultimately the correct exit, each area is carefully explained with actionable insights, practical tips, and detailed step-by-step instructions.
The level’s design not only tests your problem-solving abilities but also encourages you to immerse yourself in a visually rich and cleverly constructed environment. By following our guide and meticulously noting the clues provided throughout, you will be well-equipped to master this level and enhance your overall gaming experience. Remember, every detail matters, and a thoughtful, methodical approach will yield the best results.